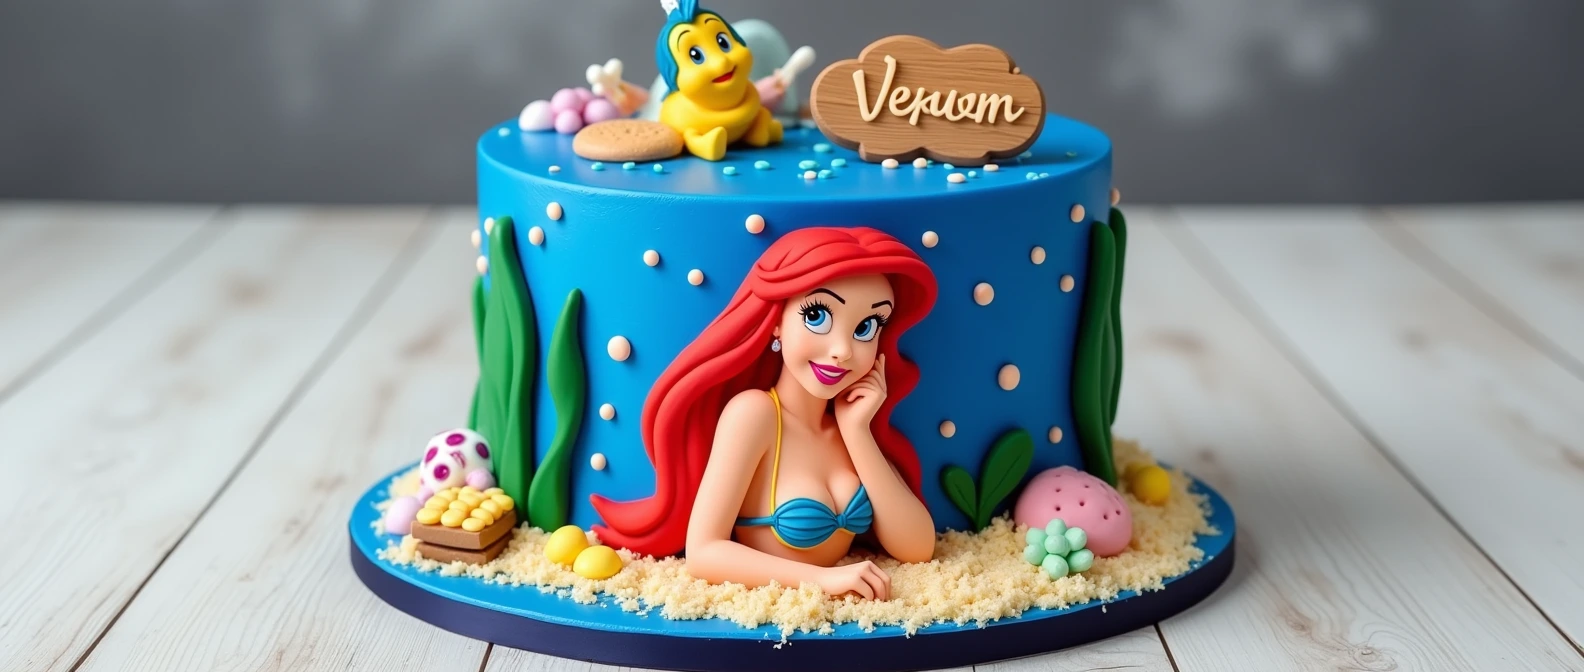
How to Make a Stunning Mermaid Cake: Step-by-Step Guide
Introduction: Dive into the Magic of Mermaid Cakes
Have you ever dreamed of crafting a cake so enchanting it transports you to an underwater paradise? Whether you’re planning a birthday party, hosting a themed celebration, or simply indulging in your love for mermaids, a mermaid cake can be the perfect centerpiece. With a few simple steps and a dash of creativity, you can create a stunning masterpiece that will leave everyone in awe.
Table of Contents
This guide is designed to take you through every detail of making your very own mermaid cake, even if you’re new to baking. Get ready to dive into the magic!
Ingredients and Tools You’ll Need
Ingredients for the Cake Base
To create a delicious and moist cake base, you’ll need the following ingredients:
| Ingredient | Quantity |
|---|---|
| All-purpose flour | 3 cups |
| Sugar | 2 cups |
| Baking powder | 1 tbsp |
| Unsalted butter (softened) | 1 cup |
| Eggs | 4 large |
| Whole milk | 1 cup |
| Vanilla extract | 1 tbsp |
| Gel food coloring (various shades of blue, purple, and green) | As needed |
Ingredients for the Frosting and Decoration
Frosting and decoration are where the magic truly happens. Here’s what you’ll need:
| Ingredient | Quantity |
| Butter (softened) | 1 cup |
| Powdered sugar | 4 cups |
| Heavy cream | 3-4 tbsp |
| Vanilla extract | 1 tsp |
| Gel food coloring (same as above) | As needed |
| Fondant (white) | 1 lb |
| Edible glitter | As needed |
| Mermaid-themed decorations (e.g., edible pearls, seashells, and tails) | As needed |
Essential Tools
Having the right tools will make the process smoother and more enjoyable:
- 8-inch round cake pans (2-3 pieces)
- Mixing bowls
- Electric mixer
- Offset spatula
- Piping bags with assorted tips
- Fondant cutters (seashells, starfish, and mermaid tail shapes)
- Turntable for cake decorating
Step 1: Baking the Cake Base
Preparing the Batter
Baking the perfect base is the first step to your stunning mermaid cake. Follow these steps:
- Preheat your oven to 350°F (175°C).
- Grease and line your cake pans with parchment paper to ensure easy release.
- In a large mixing bowl, cream the butter and sugar until light and fluffy. This step ensures your cake has a soft texture.
- Add eggs one at a time, mixing well after each addition.
- Gradually mix in the dry ingredients (flour and baking powder), alternating with milk and vanilla extract. This method prevents lumps and creates a smooth batter.
- Divide the batter evenly among three bowls and color each with gel food coloring to create an ombre effect reminiscent of ocean hues.
Baking Instructions
- Pour the batter into the prepared pans, spreading it evenly.
- Bake for 25-30 minutes or until a toothpick inserted in the center comes out clean.
- Let the cakes cool completely on a wire rack before assembling. This step is crucial for stability.
Step 2: Preparing the Frosting
Whipping Up the Buttercream
Your frosting will tie the whole look together. Here’s how to make it:
- Beat the softened butter in a large bowl until smooth and creamy. This creates the base of your frosting.
- Gradually add powdered sugar, mixing on low speed to avoid splatter.
- Add heavy cream one tablespoon at a time until the frosting reaches a spreadable consistency.
- Mix in vanilla extract and divide the frosting into separate bowls. Tint each bowl with gel food coloring to match your chosen mermaid theme colors.
Step 3: Assembling the Cake
Layering and Crumb Coating
- Place the first cake layer on a turntable. Use a dollop of frosting to secure it in place.
- Spread an even layer of frosting over the top and add the second cake layer. Repeat this process for all layers.
- Apply a thin crumb coat around the entire cake to seal in loose crumbs. Chill the cake for 30 minutes to set the crumb coat.
Adding the Final Coat and Decorations
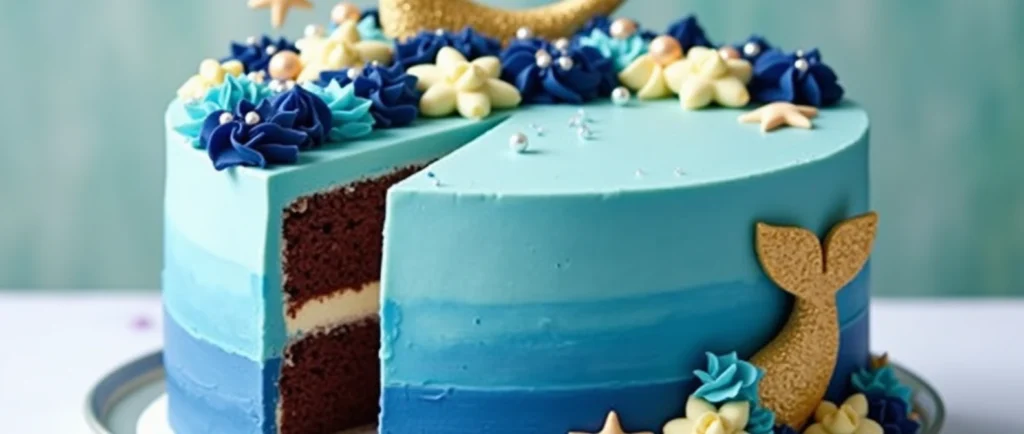
- Frost the cake with the tinted buttercream, blending colors seamlessly to create a gradient effect. Use an offset spatula for smooth application.
- Roll out the fondant and use cutters to create decorations like mermaid tails, seashells, and starfish. Add texture with a fondant modeling tool.
- Arrange the fondant decorations on the cake, securing them with a small amount of frosting if needed.
- Sprinkle edible glitter and pearls to add sparkle and complete the underwater look.
Step 4: Final Touches and Presentation
Displaying Your Mermaid Cake
Presentation is key! Here’s how to make your cake stand out:
- Use a themed cake board for added flair.
- Surround the cake with matching cupcakes or cookies for a cohesive dessert table.
- Add a small light source beneath the cake stand to create an ethereal glow.
FAQs About Mermaid Cakes
How do I make a mermaid tail decoration?
To make a mermaid tail, roll out fondant and use a tail-shaped cutter. Add scale details with a fondant modeling tool and dust with edible glitter for a shimmering effect.
Can I use store-bought cake mix?
Absolutely! Store-bought cake mix can save time. Just focus on the decorations to make your cake unique.
How far in advance can I make the cake?
You can bake the cake layers and prepare the fondant decorations up to two days in advance. Assemble and frost the cake the day before serving for the freshest taste.
What’s the best way to transport a mermaid cake?
Use a sturdy cake box and secure the cake with non-slip padding underneath. Avoid exposing it to direct sunlight or high temperatures.
Create Your Own Mermaid Magic
Making a stunning mermaid cake is more than just a baking project; it’s an opportunity to unleash your creativity and bring joy to any celebration. With this step-by-step guide, you have all the tools and tips to craft a cake that’s as delicious as it is beautiful. So, gather your ingredients, put on your apron, and let the magic begin. Your underwater masterpiece awaits!
Ready to share your creation? Post your mermaid cake on social media and tag us for a chance to be featured. Don’t forget to subscribe to our blog for more enchanting baking guides and tips!
